Pages

Saturday, October 4, 2014

Kings of War: Magic Item Cards


A brief deviation from video games! A small group of friends and I semi regularly enjoy thrashing each other in head to head matches of tabletop war gaming. Our current go to is Kings of War. The ruleset for KoW was built by Mantic Games. The beauty of this game and many other games they produce is that the core rule sets are 100% free! Talk about good guy game companies! They do produce entire lines of miniature models as well as boxed sets for their games, but all you really need to enjoy most of their titles are representative scale minis and you are ready to rock.

One aspect of KoW that can make matches more interesting is the ability to "purchase" magic items. When you are setting up your roster, you have a set quantity of points to be allocated towards units based on the match size. Each unit costs a set number of points. Modifiers can be applied to units to make them more robust, but this also costs points. In place of spending points on units, you can pick up magic items to be used by units.

In a match or campaign, only one instance of a magic item can exist per army. Sure, this can be tracked on a roster sheet, but that isn't a fun or beautifully visual way to do so. My friend Bill (who runs www.diy-terrain.com, a fantastic tabletop gaming blog) asked me if I wanted to partner on a project to make a custom set of magic item cards that we could use for matches. I saw what a fan-freaking-tastic idea this was and went to work!


Saturday, September 13, 2014

SLALOM: Nostalgia & Color Palettes


In my youth, there were a series of NES games I experienced not because I had immediate access to them, but because I had family that owned them. I think most consoles players can relate to this experience. You never had to own all of the carts if you had friends or family you could swap with from time to time.

I never personally owned Slalom, but it resided with a mighty collection of NES carts at my Grandma's house. My Grandma didn't jam much on this game, but she had her three go to games: Kid Icarus, Gauntlet, and Legend of Zelda. How hardcore of a gamer was my Grandmother taking on titles of this difficulty? The hardest of the hardcore of course! At one point, my Grandma had the entire over world from Legend of Zelda mapped and gridded out with all secret and dungeon locations revealed. She even mastered the second quest unaided. It's also fair to mention, she didn't sleep much either.


I digress.. Slalom is one of the many titles that when I fire it up, the smells of long spent menthol cigarettes, acrylic paint, and the old wood floors of my Grandma's hobby room come back to me for just a flicker of a moment as if I'm back in 1988. Briefly in my mind, I'm back in that room playing NES with my Grandma. Some games are more than just fun to play, the are a window into my own youth that reverberate so powerfully I can fully recall those moments. These games in many ways, are like my own personal flux capacitor, they make mental time travel possible. The visual stimulus that stays with me from this cart is the color palette from this game. The palette isn't deep, but it's a strong visual mix. The color themes can be seen throughout each of the screen caps in this post, I have a breakout of these at the bottom of the post.

Sunday, September 7, 2014

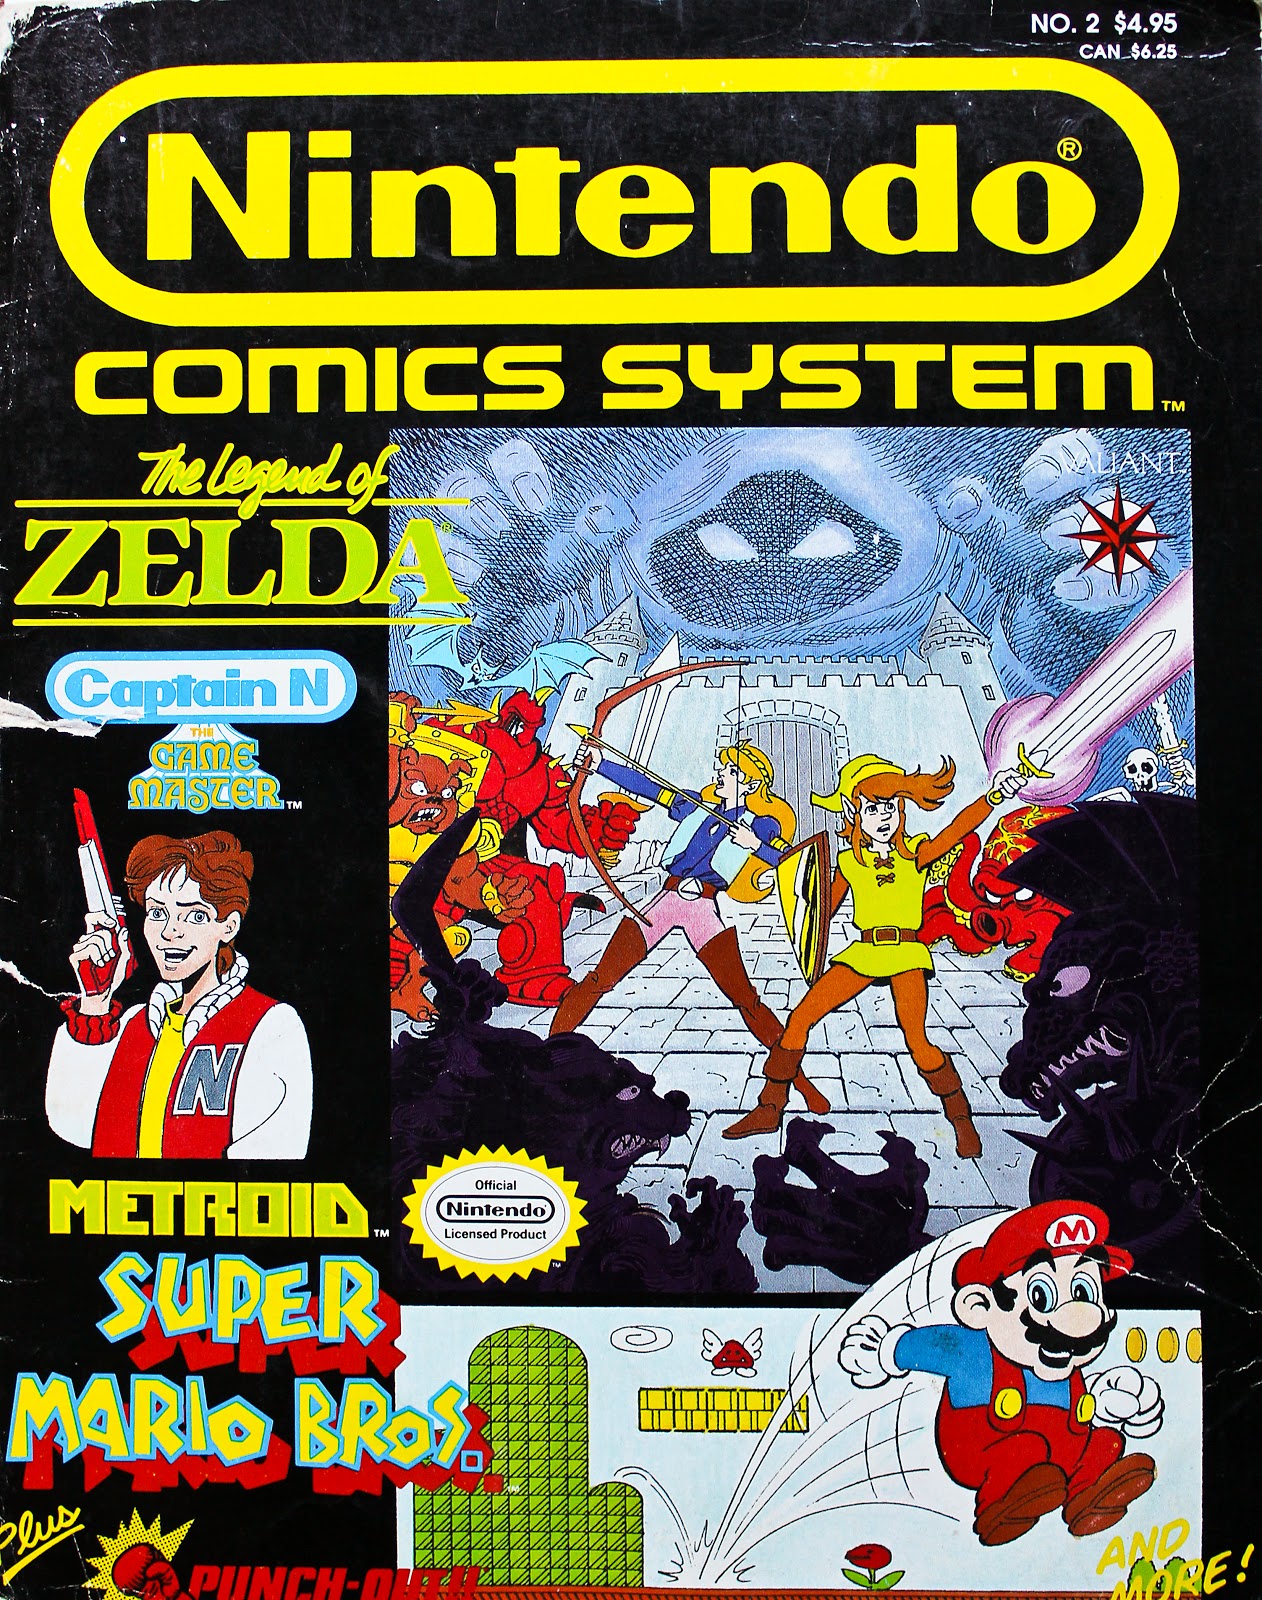
Nintendo Comics System No. 2: Photo Gallery

While reorganizing my basement, I yet again stumbled across this old gem. Issue No. 2 of Nintendo Comics System. This divine tome was originally acquired circa 1990, barely cooled off the presses prior to a long road trip with my family. I was 7 years old at the time, and this book kept me entertained to no end. Cherished then, still cherished now. 

Growing up a Nintendo fan boy, this comic collection had it all! I was a huge fan of all the Nintendo franchise cartoons airing around the same time this was birthed off of a printing press, so this was merely another awesome extension of the franchise for my young video game anything and everything hungry eyes.

The cover is tattered, the adhesive in the binding has lost it's grip on the pages within. No more perfect time than now to snap some shots of some of my favorite panels and pages before I tuck it away to be once again discovered by my future self.

Enjoy.


Tuesday, September 2, 2014

Pokémon Yellow: Pikachu ONLY Challenge!


Growing up, Pokémon was just getting hot while I was in 5th grade. I watched the Saturday morning cartoon, played the CCG with my bro, and faced off on Game Boy against friends. Often mocked as being a "kiddie" franchise, I could have cared less and could still care less. Fun game, solid entry level RPG all things considered.


Being able to run a Game Boy Advanced emulator on my phone has afforded me the time to squeeze in a revisit of Pokémon: Yellow Edition in my free time (Which currently comes at a premium with a 5 month old around! :D) What's not to love? You get Pikachu right off the bat, he follows you around the game, you can check in on his mood, and get to play through the story more like the way the cartoon played out.


To make this more challenging on myself since at this point the straight up gameplay is all I care to do (the side quest of collecting 150 digital animals has minimal appeal to me at this stage of my gaming "career"), I am going through the game only using my initial Pokémon to do any/all fighting. If he is knocked out in a fight, I reset, reload, and try again. I decided that Pikachu, being my champion, needed an appropriate nickname. I settled on "Mouse Lord". I will of course be picking up a handful of other Pokémon along the way so I have a means to use the HMs Cut, Fly, Surf, and Strength. These are essential for progressing through the game and can't be learned by Mouse Lord.


Friday, August 8, 2014

Ganon Face Punch as I Ride My Flying Duck to Victory!


This run through of Legend of Zelda: a Link to the Past took me roughly a month to get through. My play sessions were limited and I found myself going days between sessions. I also spent a good deal of time watching record holding speed runners work their magic and researching methods for making the magic happen on my own. That being said, I'm pretty pumped to get into actual speed running trials of my own. 

Thursday, August 7, 2014

Misery Mire & Turtle Rock: Dungeon Finale


By this point into the journey, I've abandoned my original route, I'm ready to wrap up this play through and dig into some serious speed running in addition to the next game on the list. Misery Mire and Turtle Rock. Two pain in the rumpus dungeons. Misery mire is first.


Pictured above isn't really a time saver, but more or less a sequence break. When you first enter the dungeon, you are greeted with a gaping hole in the floor with blocks on either end. The intent is that you need to hook shot across. Not necessary. Get as close to the edge of the pit as you can, turn, and run dash into the block. The impact of your face on the block has enough force to send you rocketing over the abyss to safety.


The room with the big chest containing the Cane of Somaria is another that "implies" that you need the hook shot to traverse the space. Once you enter the room, you have a few seconds to get to the bridge before it begins to collapse. The hook shot enables you to do this very easily. It's not needed however. As soon as you enter the room, just execute a few careful and controlled dashes to get over to the block then just run normally up the bridge. You have a small window to do this, but it is not a difficult trick to pull off.

You will need to get the cane here before advancing to Turtle Rock. That dungeon is not possible without the cane on a legit in bounds run through.

Sunday, August 3, 2014

[TMNT] Cart Photo


A brief deviation from posting about LoZ: aLttP speed running..

A cart in my personal collection I've never beaten, Teenage Mutant Ninja Turtles. Definitely is on my list of games to be dominated. For the sake of actually beating the damn thing, I'll eventually do a play through via an emulator so I can take the cowards way out and save as I go. This is one of those games that requires a near perfect play through with next to zero margin for error. This is a game birthed from an age where game devs were unrelenting and heatless towards the lack of eye-hand coordination possessed by the average 8 year old.

I haven't taken a run at this cart in years. Maybe even a decade or so. From run throughs as a wee whipper snapper, I recall making it past the dam level and not too much farther with MAYBE two turtles still intact. The thrill of the challenge is calling me back. Soon my pretty... SOON.

Friday, August 1, 2014

Swamp, Skull, and Ice Palaces: Vanilla, Vanilla, BOMB JUMP!


My runs through the Swamp and Skull palace were largely vanilla. At this point, I'm not super familiar with any massive time savers that can be done in the Swamp Palace beyond just knowing your route and being able to run it quickly. Skull Palace is a breeze, you just need to acquire the master key for the dungeon, bounce over to get the fire rod from the big chest, then proceed to the final leg of the Palace and the boss fight. There is a neat skip that can be done to get at the fire rod while skipping a few rooms and the act of blowing up the wall behind the chest. 


You can utilize the bomb jump technique to blast over one of the holes and get instant access to the big chest. I failed to try it this time through, but you can see a video of it being done HERE (AGDQ 2013, LoZ: aLttp Speed Run by Cyghfer). This video was actually one of the first speed runs of this game that inspired me to dive into the mechanics myself. Most speed running is done on the Japanese version of the game, and on version 1.0 to boot. The text boxes pass faster in the JP version, and there are a few "features" that were later removed such as item dashing

Tuesday, July 29, 2014

LoZ: aLttP | Understanding Damage


Continuing to adhere to the "100% No Save and Quit" route off of zeldaspeedruns.com, you spend the majority of the run wearing the green tunic as your primary protection. Following this route you skip grabbing the blue tunic in the Ice Palace. Why such madness? Why leave yourself unprotected? By doing so you shave a mess of time off of the speed run to avoid back tracking and extra screwing around (if you are speed running that is).

If you are not speed running, get the blue tunic when you can and carry on your quest. If you are speed running (or striving to speed run) and will be under protected, it's not a bad idea to understand how damage works in LoZ: aLttP. I always assumed that each grade of better "armor" just increased over all damage reduction. Not true. Strategywiki has a great break down by each enemy and boss as to how they hurt you and you hurt them using various weapons.

If you are speed running for real, chances are you have some serious skill in the game and you are well aware of how many hits you can take from which enemies and bosses. If you are me, you are dying all over the place while wearing the green tunic because you are a magnet for damage. I needed to do some research to to understand how I could avoid being a damage pin cushion.


Let's start here: 1 full heart can count as our standard unit of measure for damage link can take as a whole number. The smallest possible increment of actual damage is 1/4 of a heart.


The Desert Vultures will deal 1 heart of damage to Link in the green tunic, 1/2 heart of damage if wearing the blue tunic, and 1/4 of a heart of damage if wearing the red tunic. In many cases, the blue tunic will reduce damage by 1/2 and the red tunic will reduce damage by 1/4. You would think that you could assume that this scale could be applied to all damage, it can't. Some enemies cause fixed quantities of damage regardless of your defenses. The Armos Knights will deal 1/2 a heart of damage regardless of what "armor" you are wearing and Ganon will deal 8, 6, and 3 hearts worth of damage for green/blue/red armor respectively.

The tunics don't always math out to an exact figure for protection in this game, but understanding the break down and where you can't afford to take hits is key to running the game in the green tunic.

Monday, July 28, 2014

Story Time! [LoZ: ALttP] | Thieves' Town Dungeon


As I descend the stairs into the dungeon, I am met by the smell of stale air and old cook fires long since burnt out. The air was drier than I expected. Most dungeons in the Dark World are damp, dank, and smelled of rot. The twisted souls that dwell here at least keep the space somewhat livable, or at least livable compared to the rest of this world. 

The stairs spill out onto a high ledge. The main room just beyond the entrance is huge. The space is divided by two levels supported by giant brick subsections spanned by stone bridges. There are guards everywhere, patrolling in no particular pattern. A scout on the outside must have spotted me and warned them I was here. The guards are clearly on alert. I'll have to move quickly and quietly.

Sneaking towards the edge of the ledge, a piece of tile cracked under my foot. I ducked down, and peered over the ledge, the guards were oblivious to the sound. The piece of tile was completely dislodged from the floor. I took the debris and slung it to the first floor down one of the left most corridors. The guards are quick to react and run towards the clattering sound. This is my chance to begin to make my way into this dungeon and locate the maiden trapped here, I take full advantage.


Wednesday, July 23, 2014

A Few Errands: Magic Duck Flute, Sword Upgrade, & Mushroom Powder


Continuing on with the "100% No Save and Quit" route off of zeldaspeedruns.com, I'm left with a few errands to complete before I venture into another dank dungeon. First up: the Flute of Greater Duck Summoning. This item is obtained in the cove of trees not too far outside of the village by completing a small series of tasks for a pointy nosed creature.

When you first approach this melodramatic little fellow in the Dark World, he offers you his shovel in return for a promise to return his flute to him from the Light World. It is located in the upper left quadrant of the grove. A "glitch warp" can be done here to save time for speed runs. When you dig in the spot the flute is buried, it will pop out of the ground and bounce over onto a patch of grass. If you have your portal placed on this patch of grass just so, you can grab the flute and instantly be tossed back to the Dark World. What this saves you is a little "cut" scene you have to watch of the flute player vanishing into thin air once you grab the flute.

Then of course if you are speed running, you wouldn't bother to play the flute for the depressed little shovel sharing monster either. This in many ways could be considered a kindness. Once you play the flute for this frowny little NPC, he turns into a tree and dies. Maybe letting him continue his pained existence is cruel, all for the sake of shaving seconds off a personal speed run record. I chose mercy and ended his pitiful existence.

Monday, July 21, 2014

Bridge Bomb Jump at Gorilla Palace


The first of the dank dungeons on this tour contains a pixel particular bomb jump opportunity that allows for easy access to the big chest. The margin for error is pixel thin, literally.

In the Palace of Darkness, once you have obtained the big key head to the long room that houses the big chest and the crumbling rail-less bridge. You have to move FAST. Immediately pick up the left skull as you enter the room and chuck it at the minion that runs towards you. If you miss with the skull, start over because you just blew it. You will have about 2 seconds, maybe 3 to line up in position, plant the bomb, move to the right location, and have the bomb explode before it falls off the crumbling bridge allowing you to gloriously bug out your eyes while you majestically soar backwards through the air. While you are air born, hold up on the D-Pad (this is key if you want to actually land on the platform). If your bomb and feet were placed with precision you will land on the big chest ledge, completely bypassing the maze room you normally go through to access the chest.


Pictured below is one of my many, many failed attempts. I easily attempted the jump 25 times at least (thank the gods for save states). I think I may have pulled it off successfully 4, maybe 5 times. Much more practice will eventually be needed.


If you really like the animation sequence of Link falling into the abyss,
buckle up because you are in for a treat! You are going to get your fill.. 

I followed a guide off of zeldaspeedruns.com originally created by Krystal. The images in this guide show precisely where to place the bomb, where to stand, and what visual cues you can use to help set it all up. I highly recommend following the wisdom shared in that guide.Once completed, collect your treasure and use the mirror to return to the entrance and quest on to the boss. 


PROOF OF WIN
Venturing down to the lowest level of the dungeon, I did battle with the dungeon boss. I came into the room with 2 and a half hearts. Not much room for error. I did win the fight, but JUST barely. 


A great technique for this fight is to charge up the sword and keep it charged while you run at the boss to hammer his silly mask off his big dumb face. By keeping the sword charged while facing the boss and using the hammer at the same time, you will bounce off the boss's mask while he tries to mow you down rather than taking hits. Once you have shattered his mask however, this technique will no longer work. You just have to be dodgy at this point and quick to deal out pain as openings are presented.


Half a heart? All the life a hero needs to dominate!


Magic duck flute!

Friday, July 18, 2014

A Dead Priest, A Lost Princess, and Blue Balls


If you are going for a speedy run through, you head straight to the castle once you have obtained the Master Sword via the shortest route possible. If you have time to waste, you go watch the priest vanish into thin air and feel bad that you just caused an NPC to die by triggering that event. Kind of a "Schrödinger's Priest" moment if you will.

The biggest time savers you can do (and frustration savers for that matter) are to just run through the rooms and avoid the elite knights wherever possible. If you don't need to clear the room to trigger the door to open or defeat a minion to get a key, just move along and don't look back. Playing this in my youth, I felt compelled to clear each room. Sure, it might just be the principle of the thing.. but you can get to the Agahnim battle MUCH quicker if you just run by the minions. Honestly, this never occurred to me untill watching it done that way in a speed run.

The pattern for the Agahnim battle is as follows: he shoots energy balls at you four times, then the fifth attack is a lighting blast that you can easily avoid by just standing behind him or any where up towards the top part of the room. The four shots are each a chance to hit the blast of energy back at him with the Master Sword. Of the four shots he blasts at you, I believe they each have about a 50% chance of being the ring of blue balls. They can't be reflected back at him, but merely scatter into more lesser blue balls that do nothing once hit. The lighting can't be stopped and hits hard and can deplete two hearts. Best to not play the hero and just hide during this attack.

Once you have defeated that shifty blue ball wizard, you are sent to the Dark World to continue your grind through treacherous dungeons! GAME ON.


Dank dungeons of the dankest caliber.

Wednesday, July 16, 2014

Masterful Mastering of the Master Sword Mastered!


Few moments stand out in a Zelda game as vivid as the moment when you finally get your sweaty little mitts on the Master Sword. This is always the moment in the plot when everything changes and you can turn around and deal out some serious pain to Gannon's minions. (Usually invloves some degree of rad cut scene to boot!)


Lightning Wizard and his deceptive blue balls enrage our hero.

Monday, July 14, 2014

3 Chumps Yield 3 Magic Pendants


The Legend of Zelda: Kicking @$$ and Taking Names In the Past. 

For this run through, we are aiming for 100% item collection while allowing saves.. many, many, saves. Although I am equipped with a respectable level of gaming skill, gaming elite I am not. I'm following the 100% No Save and Quit route off of zeldaspeedruns.com.

After watching Kryssstal's run, I felt inspired to learn some of the essential strategies used by pro speed runners. In the Eastern Palace, I attempted two of the bigger time savers of note to obtain the big key quickly and breeze through the Stalfos room. I'm running the game emulated on ZSNES, save states have been my BFF while learning these tricks. The trick to get the big key quickly took 2 attempts. Piece of cake. I ran the trick a few extra times just to get a good feel for it. On to the Stalfos room!
This trick took 5 tries to accidentally get it to work. A total of 15 to make it somewhat reproducible most of the time. Not easy, but really satisfying to reenact the same strats I had just watched only a few days before.

The Desert Palace had one small trick of note to quickly slam my body into a pillar to get a key and avoid some turret fire. Whether it be luck or skill (let's say skill because it makes me feel special), I knocked this out on the first try. No biggie.

I've observed pro speed runners using arrows to kill the dungeon boss quickly in combo with sword spinning. I had minimal luck landing arrows and missed with about 3 of the 8 I entered into the boss room with. I gave up on being fancy and just focused on smashing giant sand worm face.

Finally, I quickly made my way up Death Mountain to the Tower of Hera. Using the mirror to warp back to the entrance when needed was fan-freaking-tastic. Even though I'm not speed running and definitely mostly taking my sweet time to quest, these tricks help knock out a lot of obnoxious, joyless dungeon grinding. I'm a busy man, I don't have time to walk across rooms and long hallways! I want to just do the fun bits and punch monsters in the throat! And this dungeon had quite the fun bit, my favorite trick so far: BOMB JUMPING!

Avoiding the little floor hole puzzle to obtain the Moon Pearl is BRILLIANT. You simply set up at the gap that is preventing you from getting at the Moon Pearl, drop a bomb, and blow yourself across the gap. This only took 2 tries, and would still would have saved me time if it took a few more tries. This was one puzzle I would always screw up on the first try and wind up falling back to the ground floor. This typically results in a salvo of F-Bombs being launched into the screen while slamming the controller into my thigh repeatedly. Since I was able to avoid a total melt down and tantrum, I quickly made my way to the boss room and punched the boss's rattle butt into oblivion.


A magic sword in a magic forrest accompanied by a long winded speech from an old man.